
티스토리 뷰
웹 기반으로 인가처리는 관리자(Admin) 페이지를 만들때도 항상 필요한 기능이다. 관리자만 접근이 가능하게 한다던지 이외 사용자는 메뉴별 권한에서 특정 메뉴만 접근이 가능하게 한다던지의 기획 요구사항이 많기 때문이다. 스프링 시큐리티 설정내에서 권한 관련 소스를 아래와 같이 설정할 수도 있지만 권한이 바뀌거나 삭제될때마다 프로그램 소스를 다시 컴파일해서 올릴 수 없기때문에 권한 관련 기능을 동적으로 만들 필요가 있다.
antMatcher("/user").hasRole("USER")- DB와 연동하여 자원 및 권한을 설정하고 제어함으로 동적 권한 관리가 가능하도록 한다.
- 설정 클래스 소스에서 권한 관련 코드 모두 제거
- 관리자 시스템 구축
- 회원 관리 - 권한 부여
- 권한 관리 - 권한 생성, 삭제
- 자원 관리 - 자원 생성, 삭제, 수정, 권한 매핑
- 권한 계층 구현
- URL - URL 요청 시 인가 처리
- Method - 메소드 호출 시 인가 처리
주요 아키텍처 이해

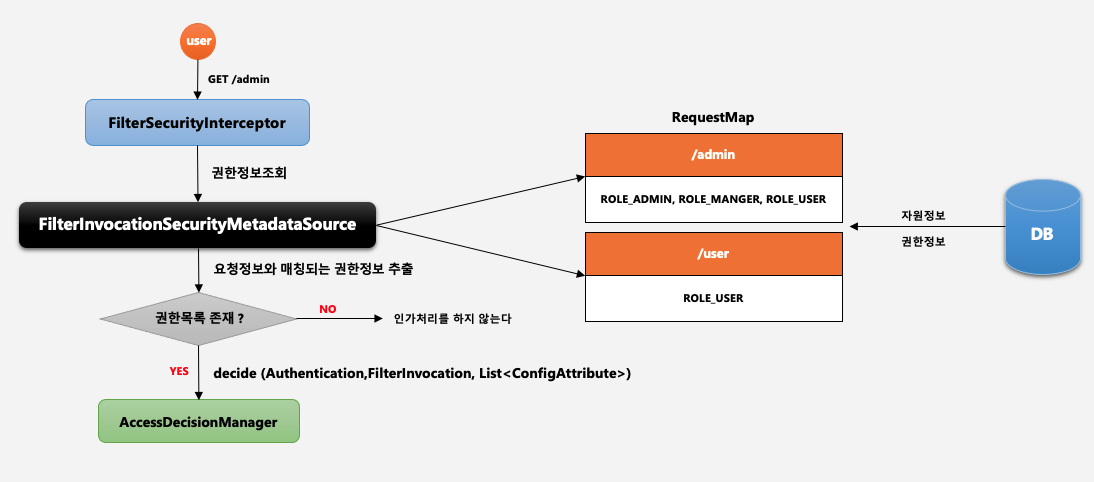
스프링 시큐리티의 인가처리는 위처럼 설정할 수 있다. 설정구문에서 인증 정보와 요청 정보와 권한 정보를 얻을 수 있다.
Filter(실제로는 FilterSecurityInterceptor)가 실제 저 3개의 정보를 얻어서 AccessDecisionManager 에게 인가처리를 위임한다.

사용자가 자원에 대한 접근 요청을 한다.
인증정보를 얻는 방법
Authentication authentication = SecurityContextHolder.getContext().getAuthentication();요청정보와 권한정보를 얻는 방법
요청에 대한 정보는 FilterInvocation 객체에서 getRequest 메소드를 사용해서 얻는다.
권한에 대한 정보는 만약 설정파일에 antMather와 권한에 대한 설정을 해놨다면 스프링시큐리티가 처음 로딩될때 key-value 형식으로 저장해 놓는다.
인증정보와 요청정보를 얻는 것보다 여기서 핵심으로 이해해야할 부분은 자원에 대한 경로와 권한 목록을 추출하는 부분이다.
@Override
public Collection<ConfigAttribute> getAttributes(Object object) throws IllegalArgumentException {
    //사용자가 어떠한 URL로 요청을 했는지 알기위해서 필요하다.
    HttpServletRequest request = ((FilterInvocation) object).getRequest();

    if (requestMap != null) {
        for (Map.Entry<RequestMatcher, List<ConfigAttribute>> entry : requestMap.entrySet()) {
            RequestMatcher matcher = entry.getKey();
            if (matcher.matches(request)) {
                return entry.getValue();
            }
        }
    }

    return null;
}
이렇게 얻은 3개의 정보를 얻어서 AccessDecisionManager에게 전달한다.
사용자가 자원에 접근 요청을 보냈다고하면 FilterSecurityInterceptor에서 이러한 동작을 한다.
/**
 * Method that is actually called by the filter chain. Simply delegates to the
 * {@link #invoke(FilterInvocation)} method.
 * @param request the servlet request
 * @param response the servlet response
 * @param chain the filter chain
 * @throws IOException if the filter chain fails
 * @throws ServletException if the filter chain fails
 */
@Override
public void doFilter(ServletRequest request, ServletResponse response, FilterChain chain)
        throws IOException, ServletException {
    invoke(new FilterInvocation(request, response, chain));
}
Authentication은 나중에 얻어오고 위에 부분에서 FilterInvocation에서 사용자 요청 주소를 알 수 있다.
그리고 권한정보를 가져오는 부분이 AbstractSecurityInterceptor 클래스에 정의되어 있다.
protected InterceptorStatusToken beforeInvocation(Object object) {
	Assert.notNull(object, "Object was null");
	if (!getSecureObjectClass().isAssignableFrom(object.getClass())) {
		throw new IllegalArgumentException("Security invocation attempted for object " + object.getClass().getName()
				+ " but AbstractSecurityInterceptor only configured to support secure objects of type: "
				+ getSecureObjectClass());
	}
	Collection<ConfigAttribute> attributes = this.obtainSecurityMetadataSource().getAttributes(object);
	if (CollectionUtils.isEmpty(attributes)) {
		Assert.isTrue(!this.rejectPublicInvocations,
				() -> "Secure object invocation " + object
						+ " was denied as public invocations are not allowed via this interceptor. "
						+ "This indicates a configuration error because the "
						+ "rejectPublicInvocations property is set to 'true'");
		if (this.logger.isDebugEnabled()) {
			this.logger.debug(LogMessage.format("Authorized public object %s", object));
		}
		publishEvent(new PublicInvocationEvent(object));
		return null; // no further work post-invocation
	}
	if (SecurityContextHolder.getContext().getAuthentication() == null) {
		credentialsNotFound(this.messages.getMessage("AbstractSecurityInterceptor.authenticationNotFound",
				"An Authentication object was not found in the SecurityContext"), object, attributes);
	}
	Authentication authenticated = authenticateIfRequired();
	if (this.logger.isTraceEnabled()) {
		this.logger.trace(LogMessage.format("Authorizing %s with attributes %s", object, attributes));
	}
	// Attempt authorization
	attemptAuthorization(object, attributes, authenticated);
	if (this.logger.isDebugEnabled()) {
		this.logger.debug(LogMessage.format("Authorized %s with attributes %s", object, attributes));
	}
	if (this.publishAuthorizationSuccess) {
		publishEvent(new AuthorizedEvent(object, attributes, authenticated));
	}

	// Attempt to run as a different user
	Authentication runAs = this.runAsManager.buildRunAs(authenticated, object, attributes);
	if (runAs != null) {
		SecurityContext origCtx = SecurityContextHolder.getContext();
		SecurityContext newCtx = SecurityContextHolder.createEmptyContext();
		newCtx.setAuthentication(runAs);
		SecurityContextHolder.setContext(newCtx);

		if (this.logger.isDebugEnabled()) {
			this.logger.debug(LogMessage.format("Switched to RunAs authentication %s", runAs));
		}
		// need to revert to token.Authenticated post-invocation
		return new InterceptorStatusToken(origCtx, true, attributes, object);
	}
	this.logger.trace("Did not switch RunAs authentication since RunAsManager returned null");
	// no further work post-invocation
	return new InterceptorStatusToken(SecurityContextHolder.getContext(), false, attributes, object);

}
여기서 이 부분이 권한정보를 얻는 부분이다.
Collection<ConfigAttribute> attributes = this.obtainSecurityMetadataSource().getAttributes(object);권한목록을 가져와서 우리가 시큐리티 설정파일에 설정한 자원에 대한 접근 권한 경로와 권한을 비교해서 matches 한다.
그 부분이 이에 대한 소스이다.
@Override
public Collection<ConfigAttribute> getAttributes(Object object) throws IllegalArgumentException {
    //사용자가 어떠한 URL로 요청을 했는지 알기위해서 필요하다.
    HttpServletRequest request = ((FilterInvocation) object).getRequest();

    if (requestMap != null) {
        for (Map.Entry<RequestMatcher, List<ConfigAttribute>> entry : requestMap.entrySet()) {
            RequestMatcher matcher = entry.getKey();
            if (matcher.matches(request)) {
                return entry.getValue();
            }
        }
    }

    return null;
}
SecurityMetadataSource 인터페이스에서 가장 중요한 메서드는 getAttributes 메소드이다. 이 인터페이스에 대한 구현체로 FilterInvocationSecurityMetadataSource가 있고 MethodSecurityMetadataSource가 있다. URL에 대한 접근권한을 구현하려면 저 인터페이스를 구현하면 된다.

중요한 점은 이제 이 URL에 대한 권한정보를 동적으로 제어하려면 db에 해당 값을 저장하고 그걸 가져와서 Map<RequestMatcher, List<ConfigAttribute>를 만들어 놓는것이 핵심이다.
UML

참고
스프링 시큐리티 - Spring Boot 기반으로 개발하는 Spring Security - 인프런 | 강의
초급에서 중.고급에 이르기까지 스프링 시큐리티의 기본 개념부터 API 사용법과 내부 아키텍처를 학습하게 되고 이를 바탕으로 실전 프로젝트를 완성해 나감으로써 스프링 시큐리티의 인증과
www.inflearn.com
- Total
- Today
- Yesterday
- 북리뷰
- Spring Security
- mybatis
- rocky
- config-location
- LocalDateTime
- maven
- Kotlin
- Bash tab
- Mac
- springboot
- oracle
- Github Status
- Linux
- 오라클
- elasticsearch
- Spring
- docker
- window
- svn
- Java
- jQuery
- input
- intellij
- 베리 심플
- k8s
- LocalDate
- JavaScript
- mybatis config
- localtime
| 일 | 월 | 화 | 수 | 목 | 금 | 토 |
|---|---|---|---|---|---|---|
| 1 | ||||||
| 2 | 3 | 4 | 5 | 6 | 7 | 8 |
| 9 | 10 | 11 | 12 | 13 | 14 | 15 |
| 16 | 17 | 18 | 19 | 20 | 21 | 22 |
| 23 | 24 | 25 | 26 | 27 | 28 |