
티스토리 뷰
들어가며
자바에서 Http 통신에 대해서 궁금해지면서 스프링의 RestTemplate 이란 걸 어디선가 본 적이 있어서 찾아보다가 JDK 1.1에 있는 순수 자바로만 Http 통신을 할 수 있는 HttpURLConnection 클래스의 사용법도 찾게 되고.. 그걸 또 사용하기 쉽게 추상화한 Apache HttpClient도 알게 되고.. 그런데 이게 버전업을 해서 HttpComponents로 사용된다는 것도 알게 되고.. 결국 마지막에 RestTemplate도 이런 기술을 기반으로 작동한다는 것도 알게 돼서 하나씩 남들이 작성해놓은 블로그를 토대로 작성(카피)해보려고 함. 엄청난 참고 신공
개발환경
Mac OS
JDK 11
Intellij
SpringBoot 2.3.8 RELEASE
API 테스트는 영진위
HttpURLConnection
HttpURLConnection은 JDK 1.1부터 있는 Http 통신을 가능하게 하는 클래스이다.
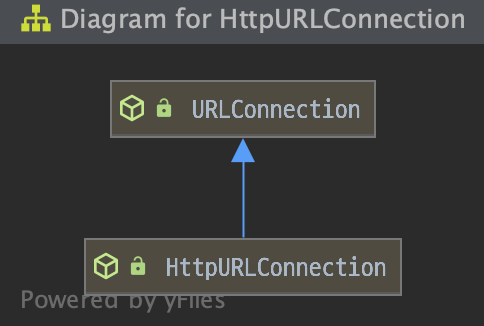
HttpURLConnection 클래스는 URLConnection을 구현한 클래스이다.
Http URL을 처리하는데 몇 가지 메서드를 가지고 있다.
기본적으로 요청 방식은 GET인데 setRequestMethod() 메서드로 POST나 PUT, DELETE 등을 요청할 수 있다..
뭐 이외에도 여러가지 기능이 있지만 나는 어떻게 쓰는지만 코딩해보고 여러 가지 관련된 부가설명들은 아래 참고에 갓대희님이 정리해놓으신 글을 읽는 게 좋다. 본인의 개발환경에서 스프링 프레임워크를 사용하지 않고 자바로만 개발해야 될 때 사용해야 될 때 참고하면 된다.
단점 중에 하나는 서버로부터 전달 받은 Response 결과가 Stream 직접 처리해야 되어서 코딩하기가 조금 귀찮다.
근대 코드는 스프링 프레임워크 사용안한다고했는데 @RestController 어노테이션에 @GetMapping 난장판이다
참고
갓대희님 URLConnection & HttpURLConnection goddaehee.tistory.com/161
@RestController
public class JavaBasicController {

    @GetMapping("onlyjavahttp")
    public ResponseEntity<Object> onlyJavaHttp(){

        StringBuilder stringBuilder = new StringBuilder();
        JSONObject jsonObject = new JSONObject();

        try {

            String urlStr = "http://www.kobis.or.kr/kobisopenapi/webservice/rest/boxoffice/searchDailyBoxOfficeList.json";
            urlStr += "?key=key";
            urlStr += "&targetDt=20210201";
            URL url = new URL(urlStr);

            HttpURLConnection httpURLConnection = (HttpURLConnection) url.openConnection();
            BufferedReader br = new BufferedReader(new InputStreamReader(httpURLConnection.getInputStream(), "UTF-8"));
            String temp;

            while ((temp = br.readLine()) != null) {
                System.out.println("temp = " + temp);
                stringBuilder.append(temp + "\n");
            }
            httpURLConnection.disconnect();
            br.close();

            JSONParser jsonParser = new JSONParser();
            Object parseObj = jsonParser.parse(stringBuilder.toString());
            jsonObject = (JSONObject) parseObj;

            System.out.println("jsonObject = " + jsonObject);

        } catch (Exception e) {
            e.printStackTrace();
        }

        return ResponseEntity.ok(jsonObject);
    }
}
HttpClient
Apache HttpComponents로 불리며 HttpURLConnection을 사용할 때보다 좀 더 편하게 개발할 수 있다.
기존의 HttpURLConnection의 스트림을 받아서 하나씩 처리해줘야 했던 것과 달리 execute 메서드로 꾀나 직관적? 이게 Http메서드를 요청할 수 있다. execute(new HttpGet(uri))처럼.. 받아온 response는 HttpEntity에 담기고 entity에서 getContent()하면 InputStream으로 받지만 바로 String으로 받기 위해서 EntityUtils의 tosString() 메서드를 사용한다.
그런데 여기서 생기는 궁금증은 Http요청을 String으로 받아도 되는걸까??? ㅠㅠ 알아봐야 할 것 같다.
참고
빨간색코딩 (RestTemaplate에 대해서도 잘 설명되어있다.) - sjh836.tistory.com/141
Apache HttpComponent 제대로 사용하기 - inyl.github.io/programming/2017/09/14/http_component.html
HttpClient 요청 보내기 - bit.ly/3qyarfs
@RestController
public class ApacheHttpClientController {

    @GetMapping("apachehttpclient")
    public ResponseEntity apacheHttpClient() {

        ObjectMapper objectMapper = new ObjectMapper();
        Object objValue = null;

        try {
            URI uri = new URI("http://www.kobis.or.kr/kobisopenapi/webservice/rest/boxoffice/searchDailyBoxOfficeList.json");
            uri = new URIBuilder(uri)
                    .addParameter("key", "key")
                    .addParameter("targetDt", "20210201")
                    .build();

            CloseableHttpClient httpClient = HttpClients.custom()
                    .setMaxConnTotal(100)
                    .setMaxConnPerRoute(100)
                    .build();

            HttpResponse httpResponse = httpClient.execute(new HttpGet(uri));
            HttpEntity entity = httpResponse.getEntity();
            String content = EntityUtils.toString(entity);
            System.out.println("content = " + content);
            objValue = objectMapper.readValue(content, Object.class);
            System.out.println("objValue = " + objValue);

        } catch (Exception e) {

        }

        return ResponseEntity.ok(objValue);
    }
}
RestTemplate
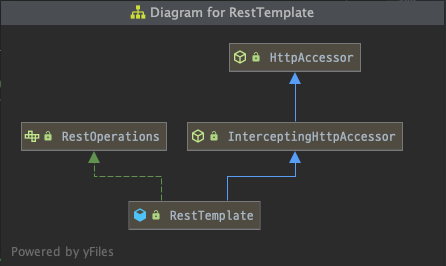
드디어 스프링의 RestTemplate.. 사용법은... RestTemplate를 빈으로 등록하고.. exchange 메서드로 사용하면 된다..
말은 쉽다. 결론은 기계적이고 반복적인 코드를 스프링이 템플릿 형식으로 추상화한 것이다.
참고
- RestTemplate 설정 변경하기 zepinos.tistory.com/34
- RestTemplate Connection pool 생성하기 multifrontgarden.tistory.com/249
- RestTemplate에 대해 - nesoy.github.io/articles/2020-05/RestTemplate
Bean 설정
@Configuration
public class RestTemplateConfig {

    @Bean
    public RestTemplate restTemplate(RestTemplateBuilder restTemplateBuilder) {

        CloseableHttpClient httpClient = HttpClientBuilder.create()
                .setMaxConnTotal(120)   //연결을 유지할 최대 숫자
                .setMaxConnPerRoute(100)    //특정 경로당 최대 숫자
                .setConnectionTimeToLive(5, TimeUnit.SECONDS)   // keep - alive
                .build();

        HttpComponentsClientHttpRequestFactory factory = new HttpComponentsClientHttpRequestFactory();
        factory.setHttpClient(httpClient);  //HttpComponentsClientHttpRequestFactory 생성자에 주입

        //인터셉터가 요청 / 응답 로거로서 기능하도록하려면 인터셉터가 처음으로, 클라이언트가 두 번째로 두 번 읽어야한다.
        //기본 구현에서는 응답 스트림을 한 번만 읽을 수 있습니다.
        // 이러한 특정 시나리오를 제공하기 위해 Spring은 BufferingClientHttpRequestFactory 라는 특수 클래스를 제공.
        // 이름에서 알 수 있듯이이 클래스는 여러 용도로 JVM 메모리에서 요청 / 응답을 버퍼링합니다.
        BufferingClientHttpRequestFactory bufferingClientHttpRequestFactory = new BufferingClientHttpRequestFactory(factory);

        return restTemplateBuilder
                .requestFactory(() -> bufferingClientHttpRequestFactory)
                .setConnectTimeout(Duration.ofMillis(5000)) //읽기시간초과, ms
                .setReadTimeout(Duration.ofMillis(5000))    //연결시간초과, ms
                .additionalInterceptors(new RequestResponseLoggingInterceptor())
                .build();
    }
}
RestTemplate 사용
@RestController
public class RestTemplateController {

    final RestTemplate restTemplate;

    public RestTemplateController(RestTemplate restTemplate) {
        this.restTemplate = restTemplate;
    }

    @GetMapping("/resttemplate")
    public ResponseEntity<Object> restTemplateTest() {

        HttpHeaders header = new HttpHeaders();
        HttpEntity<?> entity = new HttpEntity<>(header);

        String url = "http://www.kobis.or.kr/kobisopenapi/webservice/rest/boxoffice/searchDailyBoxOfficeList.json";
        UriComponents uri = UriComponentsBuilder.fromHttpUrl(url + "?" + "key=key&targetDt=20210201").build();

        ResponseEntity<Object> exchange = restTemplate.exchange(uri.toString(), HttpMethod.GET, entity, Object.class);

        System.out.println("exchange = " + exchange);

        HttpStatus statusCode = exchange.getStatusCode();   //상태코드확인
        HttpHeaders headers = exchange.getHeaders();    //헤더정보확인
        Object body = exchange.getBody();   //바디정보확인

        return exchange;
    }
}
추가로 RestTemplate 요청 전 후에 로깅을 찍고 싶을 때는 인터셉터를 추가하면 되는데 추가만 한다고 되는 게 아니라 이런 요청은 스트림으로 한 번만 읽을 수 있기 때문에 로깅으로 한번 읽으면 다음에는 읽을 수 없기 때문에 RestTemplate 빈을 설정할 때 requestFactory를 BufferingClientHttpRequestFactory로 넘겨야 한다.
참고
RestTemplate Interceptor 활용하기 - recordsoflife.tistory.com/36
소스코드
https://github.com/sskim91/java-spring-lab/tree/main/spring-resttemplate-in-action
- Total
- Today
- Yesterday
- docker
- intellij
- Spring Security
- Bash tab
- input
- Linux
- LocalDateTime
- Spring
- claude
- oracle
- config-location
- 북리뷰
- LocalDate
- Mac
- k8s
- Java
- JavaScript
- jQuery
- localtime
- springboot
- svn
- elasticsearch
- Kotlin
- mybatis config
- 오라클
- maven
- mybatis
- rocky
- window
- repomix
| 일 | 월 | 화 | 수 | 목 | 금 | 토 |
|---|---|---|---|---|---|---|
| 1 | 2 | 3 | 4 | |||
| 5 | 6 | 7 | 8 | 9 | 10 | 11 |
| 12 | 13 | 14 | 15 | 16 | 17 | 18 |
| 19 | 20 | 21 | 22 | 23 | 24 | 25 |
| 26 | 27 | 28 | 29 | 30 |